
Adventures in NMEA 2000 Wiring, Part II
Guest Entry by Dan Corcoran ---
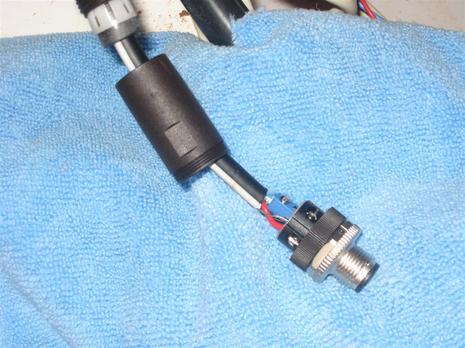
Above is a picture of a Maretron field attachable connector that I have installed on Breeze Pleeze at the end of a Raymarine spur cable. The connector provided me a reliable way to connect a Raymarine ST70 and Raymarine ST70 N2K Speed Pod onto my Maretron backbone cable, where it is part of a multi-vendor N2K network (as discussed in Part I). In this picture I have opened up the connector to expose it's internals for you to see.
This product is useful for connecting products from other N2K cabling schemes as well as creating custom length cabling in the field, after one cable end has already been snaked through the boat and the correct length has been determined.
This product accepts each of the stripped ends of a five wire N2K cable, into tiny sockets that get a positive lock on the wire with small screws, much like you would have on a 120VAC marine outlet or plug, and now on some 120VAC switches and outlets for home use. This connector is so effective, I wouldn't hesitate cutting off a pre-made end of a backbone or spur cable to make it easier to snake and/or shorten it up to the ideal length for my boat. Shortening up backbone and spur cable can be both a weight savings and power drop savings, especially since I tend to order cables that are 4-7 feet too long as pre-made cable is sold in lengths of 1 meter.
To reassemble the connector pictured above, I screw the bottom of the protective case over the connector, slide the strain relief down, and screw the strain relief onto the case. The strain relief compresses as I tighten down, a design that provides compatibility for a wide range of cable widths.
The positive feedback on the terminal screws and the strain relief design yell quality and long life, both apart and as a finished assembly ready to screw into the backbone. Something that could be better is the instructions. There are none actually, unless you count the picture on the bag. A recommendation on the sequence of attaching the five wires would be especially helpful, something like:
(1) Don't forget to slide cable relief up the wire first
(2) Connect the ground lead before the others (the ends of a stripped ground wire become quickly separated if you handle the other wires first)
(3) Leave the center (tall post) wire for last. (For some reason the center location and tall post seemed to scream out "me first", but alas, you will find the other wires more flexible to work with if you save connecting the short red wire to the tall post for last.)
I am sure that someone who has installed more than two, can further expand upon the instructions.
The other amazing thing about the connector is it's size. Some engineer found a balance between the absolute smallest size to make this, and what my clumsy big fingers can handle (my thumb is bigger than the whole connector). If this was a touch smaller, I couldn't do it. I was able to balance the entire connector in my hand while I screwed on the terminals. A small screwdriver with rotating base was very helpful, as I could balance the base of the screwdriver in the palm of my hand, and rotate, one handed, while fingers from both hands hold the wires and connector secure.
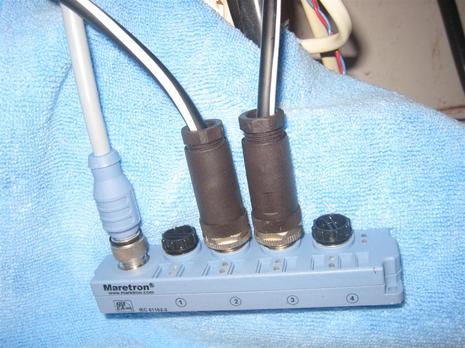
In the bottom photo, are two finished field installable connectors mated to a Maretron Micro Multiport. The Multiport lets you extend one drop cable to additional components either now or in the future, though the total drop -- backbone-to-multiport cable plus multiport-to-device cable -- still can not exceed 6 meters (for Micro or Mid size cables). The effect is somewhat similar to the Raymarine daisy chaining I like (some Furuno devices and most all Simrad Simnet devices also support daisy chaining). Except that a multiport is perfectly legal under NMEA 2000 cabling rules while daisy chaining is not, because the NMEA does not like to see one device's data passing through another device.
Both approaches greatly simplify the pre-planning of an N2K network, so you don't have to think too hard about what N2K devices might be installed five years from now that might require a backbone to reach a particular space in your boat, when just a spur will do, both now and in the future.
One best practice when designing N2K backbones for a sailboat, is to start one end of the backbone at the bottom of the mast, so you have flexibility later to extend the backbone up to the top of the mast (having one end of the backbone in the mast overcomes spur length limitations). Some products like the Airmar PB200 even have a pre-made cable available to be the last segment of such backbone with a terminating resistor built in. For sailboats, and I suspect most power boats, the other end of the backbone ends up in a remote end of the boat (mine ends at the bow) rather than at a helm or console where there is a cluster of N2K instruments.
In Breeze Pleeze, I could have snaked the middle of the backbone up and back down some dedicated conduit to my helm, a detour of 36 feet, but there is a better way.
The Maretron Micro Multiport can be positioned in the helm and connected to the backbone with a single spur, providing access to 4 devices in my helm. It effectively shortens the total amount of cable used, dramatically reduces the backbone length and any associated power drops are limited to the devices at the helm. In my case, the micro- cable I use takes 30% of the space in the conduit then two mid-sized backbone cables otherwise needed to bring the backbone up and back down.
I like the field installable connectors too, but I haven't been able to use them on a drop cable for the Garmin GMI 10s and the Garmin N2K GPS sensor. They work fine along the backbone, but as soon as I use one in a drop, the device doesn't show up. I've tried using Garmin's and Maretron's tees. Anyone else run into this problem?